Wednesday, June 23, 2010

Progress in the studio!!!

I haven't posted in a while - there are just not enough hours in a day! After work each day and on the weekends for the last several months I have been finishing up some areas in my studio and changing some things to suit my current needs. A while back I realized that I had to do something to change the path I was on. I had been experiencing this overwhelming sense of loneliness while working in my studio, and had lots of tools that were often sitting unused. I decided it was time to quit feeling sorry for myself and do something about it, so I made a plan to open my studio for beginning and intermediate level jewelry/metalsmithing workshops a few Saturdays each month. I posted an ad about it on Ganoksin's Orchid Forum, received several emails from interested people, and have already given one workshop! It has been wonderful making contact with likeminded creative people and has gotten me out of my creative rut! This new plan has also provided me with the motivation I needed to get all the unfinished studio construction projects completed like texturing and painting the walls in the shop area.  As a result of my new plans, I also created new projects like the need to reconfigure the studio area to accommodate more people, and building an area for soldering. Unfortunately, this new plan called for moving the desk/home office area,  that my husband had gotten in the habit of using, out of my studio. My poor husband feels like he has gotten the "boot", but was willing to move in the name of progress!!!

We moved all of our home files, office supplies, and my husband's computer out of the studio to a small bedroom upstairs, and moved the cabinets that he had been using as a desk into the shop area to create some soldering stations. This freed up one side of the studio so that I could create a work/seating area for my workshops. It was a lot of work, but I think it came out great! My husband has taken the move in stride. He has turned his new space into a really nice office, and is enjoying the view from the second story window!


BEFORE - My husband's office space in the corner of my studio.


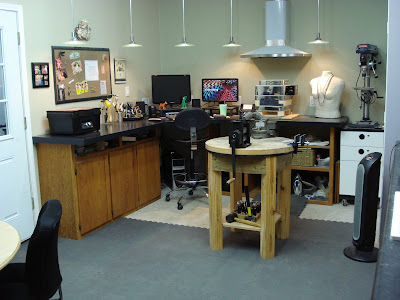
AFTER - New seating area in the same corner of my studio.


In this new space I put some bookshelves below the existing wall cabinets.  I made the bookshelves from a single tall bookcase that I cut in half with a piece of countertop material across the top.   Then I purchased a new piece of galvanized steel from a really nice guy named Ed at a local sheet metal shop and mounted it on the wall for a backsplash beneath the wall cabinets.  The steel backsplash is perfect to use with magnets for dispaying photos of students and their work.  On the other wall I hung an old pegboard that was left over from the garage before it became my studio.  For the seating area I built a round table from 3/4" plywood with threaded steel pipe legs, and bought four new armless office chairs. The aluminum ducting that you see at the top of the photo is a new addition as well.  We added on to the ducting that we had previously installed for the air conditioning and passed it through the wall into the newly finished shop area.


MORE "AFTER" PHOTOS!

The door going into the newly finished "shop" area.


Two new soldering stations in the shop area with exhaust system.
(These are the cabinets that we moved from my husband's desk area of the studio.)


Full view of the newly installed exhaust system
(awkward looking, but very effective!)


This is the right hand side of shop area with polishing wheel,
Potter USA hydraulic presses, bending brake, and belt/disc sander.
The wire butterfly on the wall was made by my oldest daughter for a
fairy costume that she wore to a Halloween party. I think it is a beautiful
piece of art and it makes me so happy to have it hanging in my studio!


A close-up view of my two Potter USA hydraulic
presses that were built by Kevin Potter.
I LOVE THEM !!!


The larger press is powered by a compressor
which is hidden in the cabinet below.


These are my Potter USA hydraulic press accessories!
Pancake dies, silhouette dies, synclastic and anticlastic
bracelet formers,and extra platens and pushers.
I love these, too!


The left side of the shop area is my new personal bench area!
The large piece of artwork on the wall is a collage that my youngest daughter and I made when she was about 14 or 15. It is made from pictures of flowers, beautiful gardens, and other peaceful scenes cut from magazines and applied to a piece of plywood with modge podge. It makes me really happy to have it over my bench area!


The newly installed air conditioning ducting for the shop area!


The studio area is pretty much the same.


The sink area is the same, no changes.

Tuesday, April 27, 2010

A Place to Hammer It Out

I haven't written in a while because of allergies.  Where I live we have more than our share of allergens and I think most of them are up my nose!  The last couple of months have been miserable....

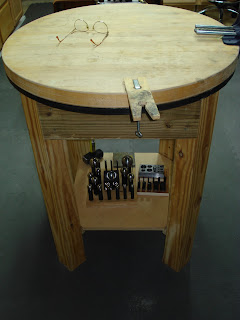
Anyway, I want to tell you about one of my favorite items in my studio. It's my hammering table.  A couple of years ago I really wanted a "stump", a real "jeweler's stump".  I asked all around and found a really nice guy who lives out in the country in a nearby town.  He was nice enough to cut a section of a fallen cedar tree for me and even delivered it.  The cedar smelled wonderful and I thought it would work out perfectly for my needs.  Unfortunately, I soon found out that the cedar wood was too soft and the stump was not perfectly flat on the bottom, so it just didn't work out.  I contemplated starting my search all over again until I realized I had just the thing sitting in my storage building - a butcher block pedestal table that had an Early American style base that didn't match my home decor.  Not only did I not like the style of the base, but since it was a pedestal  table I knew it would not be sturdy enough for pounding. I took the butcher block top off of the base and searched for something to use for legs.  In a pile of leftover lumber from a deck that we built in our back yard I found some 4 X 4 posts and some other usable lumber and was able to construct a VERY sturdy table that has worked out perfectly for all the hammering I do while stamping or texturing metal.


Friday, January 8, 2010

Tip: plan it out

Today I've been thinking about the process of setting up a studio.  My studio kind of "evolved" as I figured out what I wanted and my husband helped me install all the necessary components.  It would have been much easier if I had planned it out beforehand, so I want to give you some pointers to help you design your space .

Setting up a jewelry studio is a bit more involved than setting up a place to paint, or sew, or string beads.  There are several important things to consider.  First of all there are safety issues.  Many of the processes that are used in jewelry making or silversmithing involve using chemicals or dangerous gases. For your safety and the safety of your family or anyone else living in your home (including pets) it is important to understand the need for fresh air, a way to exhaust dangerous fumes, and ways to protect your eyes, ears and lungs.  There are several articles dealing with the subject of studio safety. Here are some links:

http://www.ganoksin.com/borisat/nenam/basic-studio-safety.htm
http://www.ganoksin.com/borisat/nenam/fire-safety.htm

There are many other excellent articles on the subject of safety and other jewelry studio and jewelry making  topics on the Ganoksin website. If you have never utilized it,  I highly recommend it.

Once you have educated yourself on all the dangers and safety precautions, the next thing you need to do is decide where your studio will be located. For some of you it will be in a garage or an unused room in your home or apartment if you are lucky enough to have that kind of space.  Others of you will have to think outside the box to find a space. Some homes have large walk-in closets that would work great for a workspace as long as you are not using chemicals or gases. If you decide to use your garage like I did, you will have to be sure that everyone in your family is on-board and respects your space since garages can be a catch-all for "stuff", and you don't want all that "stuff" ending up back in your new found "studio".

Here are the reasons that my garage was the best location for my studio. If your garage area is similarly set up, you might be looking at your perfect studio space:

1. My garage is part of my home
2. My garage can be closed off if necessary by a heavy door whenever there is loud pounding going on
3. We were able to duct air conditioning and heat into the garage
4. We were able to connect to water and drain pipes in the wall for a studio sink.
5. We were able to add an exhaust vent to the outside
6. We were able to add extra circuits to the electric panel which is located in the garage, so we could install extra electrical outlets, switches, and lighting


If you have a room in your home where you can tap into, or add things on to existing utilities, you will have the perfect jewelry studio.  The only thing my jewelry studio is lacking is a window. I would do anything for a window, but I feel so blessed to have everything I have, that I don't complain about not having one!!!

Once you find an area that will work for your studio, get some paper and sketch out a floor plan. Graph paper works great for this. Draw out the dimensions of the room and mark the doorways, windows, and the areas where water, electricity, and even gas if you have it, are located.  Then play around with ways of setting up your work areas. If you are on a tight budget, try to think of things you already have in your home that will work for tables and storage units.  When I first started using my garage for my studio I had several hand-me-down tables, desks, and chairs that I used.  Even card tables can work. You can also use 2 two drawer file cabinets with a hollow core door laid across them to make a really nice worktable.

I have an L shaped counter that I built for my studio that I constructed entirely out of reclaimed items. The cabinets at the bottom are made from an old oak entertainment center that my parents were getting rid of.  I cut it in half right across the middle horizontally and used the two halves as base units to attach the countertop to.  The countertop is constructed out of several pieces of 3/4" plywood that were left over from another project, that I glued together, sanded, and then primed, painted and sealed with urethane. Eventually, when I decided to add some more cabinets and countertops, I used some old cabinets that had originally been in our kitchen after we remodeled one side of it.  Then I went searching and found some similar cabinets that were on sale for half off at Lowe's. They don't match, but they are sturdy and were cheap!  It doesn't have to be beautiful, just functional.


HAKKO 493 bench top smoke absorber

Earlier I talked about safety and the importance of having an exhaust vent to draw out the fumes in your studio. If you don't have a way to set up a vent to the outside for your soldering area there are table top exhaust fans with filter systems built in that are made for glass and jewelry artists.  Here is a link:
http://www.hakkousa.com/detail.asp?PID=702&Page=1.  At around $110.00 it is an affordable solution to protecting your health while soldering.

The next thing I would suggest when planning out your workspace is to set it up so that you can get to your tools easily.  The old theory about the "kitchen work triangle" applies to the studio as well.  Plan to have certain areas for each different part of your jewelry construction process and try to locate them fairly close to each other so that you don't have to walk all the way across the room to grab a tool.  Also consider how you will move around in your space. Whether you are right handed or left handed will make a difference when you are working, especially when it comes to sawing and using a flex shaft, so keep that in mind while planning. If you have an area in mind for your exhaust fan over your soldering area, then try to locate your sawing, cutting, and hammering area close by on one side, and your finishing or polishing area on the other side, so all your tools are close at hand. Once you have decided on your layout, set up your tables and see if your ideas work in real life.  Sometimes what you  think will work on paper, doesn't work well when you try it out.  When I first set up my garage/studio I thought I would be able to do everything in one area.  After a while I realized I really wanted an area that could be closed off for all the messy, smelly, loud stuff. You may want to consider that when planning your studio.

Once you have your spaces defined it is a good idea to organize your tools so you can find them easily.  There is nothing more frustrating than getting into the groove of working on a piece and suddenly realizing you can't find the burnisher or the file you need.  Some of the organizational tools that have helped me out are some simple plastic bins that can be found cheaply at your local home improvement store. You could also use shoe boxes or any kind of container.  Another thing that has worked out really well is the magnetic tool strip that I have on the wall behind my workbench. The picture shows a pair of pliers stuck to it, but I use it for all my tiny files. Here is a link to one of my favorite jewelry supply sites that carries them: http://www.fdjtool.com/ProductInfo.aspx?productid=13.380.  By the way, you won't find a nicer bunch of people than the folks at FDJ Tools.  They are a family owned business and will go out of their way to help you. If they don't know the answer to your question, they will find someone who does. They are awesome.


MAGNABAR 12" Magnetic Tool Holder

Speaking of tools, there are many tools that are used in jewelry making that can be found more cheaply than at jewelry supply companies.  Always check around to see what is available at your local hardware or home improvement store - even computer parts stores.  I have found many tools, like my bench grinder that I use as a polisher, and my bench vise, at the hardware store for half of what they cost at the jewelry supply.  You can also find "third hands" exactly like the ones in jewelry tools catalogs at your local computer tech store. Of course some tools like rolling mills and magnetic tumblers can only be found at a jewelry tools supply company, but it certainly pays to shop around before purchasing.  Also check ebay and Craig's List.  My kiln was one of my very first tool purchases.  I found it on Craig's List for about a forth of what it cost new.  The lady who was selling it had only used it twice and she only lived about 10 miles from my house. I felt like I had won the lottery!

So, spend some time planning things out and shop around a bit before you buy - you will be glad you did.  In my next post I will show you some more of my favorite tools and where I got them.

Tuesday, January 5, 2010

Micro-Mark cut-off tool review


A few weeks ago I talked about a tool that I was going to order from a company called Micro-Mark. I ordered it, and I used it for a jewelry piece I was working on that required cutting a number of different sizes of sterling silver tubes. I had my doubts about how well it would work, since I have been known to order tools based on the advertised claims from the seller, only to be disappointed, and end up returning them!!!  This tool is small, but it's heavy and appears to be well made. It worked really well for cutting the tubing. It has a very thin, but tough, abrasive cut-off wheel that zipped right through the tubing without a lot of vibration. The cut edge of the tubing had a bit of a rough edge or burr on the bottom side of the cut which was easily removed with a file. The tool has a sturdy vice that holds the tubing securely so you will have a straight and level cut. I believe that it literally cut hours off of my construction time since I didn't have to sit there sawing away at the tubing and fighting with the saw blade every time it got stuck on the edges of the tubing. The other nice thing is that, because the blade is very thin, there is not a lot of material loss. I was thinking I might find a box with low sides or a tray to set it in so I can collect the silver dust.

I would definitely suggest this tool as a "must have" for your studio if you cut a lot of tubing. Here is a link to the site:
http://www.micromark.com/MINI-MITER-and-CUT-OFF-SAW,6466.html

Monday, January 4, 2010

What I did on my Christmas Vacation

The Holidays are over, and looking back at the last 2 weeks I have to just smile and say "Oh, well!", because it doesn't seem like we really had a vacation. On Christmas Eve day I realized that I was getting a sore throat that reminded me of the "swallowing razor blades" feeling I would always get as a kid when I had strep throat. I called my doctor and was able to get a Z-pack called in and started it right away. We were supposed to get together with family on Christmas day, but decided to stay home so I wouldn't be "Typhoid Mary" and infect everyone with my germs. By the next couple of days I was feeling better, so my husband and I decided to take on a project that we had planned to do over the Holidays: installing a water softener. To all of you jewelers out there who know how to solder I have a tip for you: you can save a lot of money on plumbing bills if you put your skills to good use in your home! We bought a nice unit from our local home improvement store and installed it in a day. The fun part was that our home was not plumbed for the softener! We had to locate the water main coming into our house, shut off the water at the street, cut into the line and add some couplings and elbows and other pieces to hook up the softener. You can use your soldering skills to connect the pipes. The steps you have to take are almost exactly the same. You cut your pieces and dry fit everything together. Make sure all your cuts are straight and flush, clean your pieces where they will be soldered together by sanding the surface, then coat the area to be soldered with water soluble flux, heat the area slowly with the torch until the flux runs and add the non lead solder. In the plumbing world they call it "sweating" the connection, but it's pretty much the same a soldering a piece of jewelry together.

Anyway, we installed the water softener (which is located in a closet along with an electric water heater in the corner of my studio) , and we were very proud of ourselves. The unit seemed to be working just fine, so we went about some other chores. The next day we were in the studio when all of a sudden a really strange noise like "Boooooing" came from the water heater and the lights in the studio flickered. My husband and I looked at each other in horror wondering what in the world had happened, and fearing some horrible event had taken place in that closet.... had we installed something wrong? We checked the electric panel and the breaker for the water heater was tripped. Great. What now. So my husband switched it back to the "on" position and everything appeared to be OK. Whew! Maybe it was just a fluke!

We went to bed that night a little nervous about the breaker incident, but hoped for the best. When we awoke the next morning I went to take a shower and found that we had no hot water. The breaker was tripped again and flipping it back on did not work this time. My husband scratched his head and said "what did we do wrong?  Did installing the water softener cause the water heater to go out?" I told him that I had been expecting the 8 year old water heater to go out soon since we have very hard water and surmised that it was probably at least a third full of calcium. We checked the heater and found that the heating element at the bottom of the tank had shorted out due to the calcium build up.

So, we had another plumbing project on our hands. We purchased a new water heater and drained the old one. (My guess was correct by the way, I measured the water that we drained with a 2 gallon container and was only able to drain 51 gallons out of that 66 gallon tank!) Getting the old one out of closet was a superhuman feat since it sits on a platform that is about 18 inches off the ground in a closet. Somehow we managed to "walk" it down a makeshift set of platforms that we threw together with odds and ends until we could get it to the floor and out of the way. With all the "rocks" in the bottom it was really heavy! Then getting the new heater into position was another superhuman endeavor! But, we did it!!! We spent half the day on New Years Eve and all day on New Years Day installing a new water heater. So far everything is working great! We have plenty of hot water and no calcium deposits!

Woooooooooooooohooooooo!


What did YOU do on YOUR vacation?  :o )

Friday, December 11, 2009

This new hook is not just for the birds!

When I set up my tool stations in my shop area I used an old Dremel tool holder for my flex shaft. It was a metal pole with a hook on the top. It was wobbly and didn't really hold the motor at the right height. In the user manual that came with my Foredom Flex Shaft it said to hang the motor at least 30 to 40 inches above the work surface. It was frustrating because with the motor hanging at about 24 inches on the Dremel tool holder, the weight of the shaft pulling down on the hand piece made it difficult to hold. I had an extension piece for the Dremel hanger pole, but the taller I made the pole, the more wobbly the whole thing became. Also, the clamp on the Dremel tool holder pole is plastic and not very strong. This would be fine for a Dremel, but not for the weight of the Foredom.


Old Dremel Pole

So, I got on the web and searched for a better solution to my problem. I searched for hooks, poles, and hangers of all kinds. Nothing looked quite right until I stumbled on something on a bird website of all things. It was a long steel pole with a large hook on the end that comes with an adjustable bracket so it can be attached to a wall or deck railing. It was made for hanging a bird feeder, but it looked like it would be perfect for holding my flex shaft. And, on the bracket was a knob that could be tightened to hold the hanger in any position or it could be allowed to rotate freely. The info on the site said that it could hold 15 pounds, so I figured it would be heavy duty enough for my needs. When the package arrived I was really pleased with my purchase! The hanger is heavy gauge steel, and the bracket is heavy duty and well made. I attached it to a stud on the wall behind my flex shaft area so that the top of the hook is at about 40 inches.


New Bestnest Pole

The hand piece for the flex shaft is at just the right height for me while sitting on one of my tall stools. To find this hook go to: http//www.bestnest.com/bestnest/poles_hangers.asp , and look for the Green Esteem Extended Reach Wall Bracket, Item # GRE-60500, Black, 36", Price:$29.99. It has worked out really well, and has freed up a lot of space on my bench top and allows me to move freely without bumping into a pole. They have other sizes & prices of wall hooks available, but this one had the longest reach which is what I needed for my workspace.

Thursday, December 3, 2009

I don't care if the walls aren't painted - I'm moving in!

The weekend before Thanksgiving I taped and floated all the joints on the sheetrock walls.  And, even though it's not completely finished, I moved a lot of my tools into the area. I had 3 full days off from work after Thanksgiving and I wanted to be able to spend it making jewelry.  I arranged my work space so that all of my tools were easily accessible. I set up stations for doing each part of the process. In the shop I have a cutting, drilling, and grinding area, an area for annealing, soldering, and pickling, an area for hydraulic pressing and forming, and an area for wheel polishing.  In the studio I have an area for drawing, designing, and beading, an area for hammering, an area for my tabletop kiln, and a wet area for anything that requires water, like my tumbler, my shaper, and my lap machine.


This is one side of the "shop" area.

On Thanksgiving Day we had family over and did the usual cooking, feasting, and spending time with family. It was great having everyone here, but secretly I could hardly wait for Friday to come.  With all the construction projects and other things going on, I had not had much "Studio" time.


This is the other side of the "shop" area.

On Friday I finished organizing my workspace. I have a new air/acetylene torch that I had gotten several weeks before, but had not set it up yet.  I wanted to wait until my husband could help me. (I have a healthy fear of gas tanks and fire, and wanted his help to be sure I was following the directions properly so as not to blow up myself or the house!)  He helped me attach the regulator, the hose, and torch handle, and we checked all the connections with a mixture of liquid dish soap and water. Everything was tight, so I fired it up and tried all the tips. Five different sized tips came with the torch. The second to the smallest tip seems to work the best for soldering.


My new torch!!!!  Wooooohoooooooo!

On Saturday I started making a new piece that had tubing as part of the design. Cutting each piece by hand using a jeweler's saw was really tedious and time consuming. About half way into the project I was really wishing for some kind of tool to make the process faster and easier. Yes, I know I said "No more buying tools."  So, I will have to change that - no more big expensive tools for now!  Anyway, I did some looking on the web at several different miniature miter/cut-off saws.  The places selling them claim that they make the job of cutting tubing much easier.  I also did some reading on the Ganoksin website to see what tools other jewelers were using for cutting tubing. Many of them wrote about using a miter saw made by Proxxon, and a few of them wrote about the mini miter/cut-off saw available from Micro Mark. After reading reviews on a lot of different websites I could tell that the only way to find out which would work was to order one and try it out.  I decided that I would order the mini miter/cut-off saw from Micro Mark to start out with and hope for the best.

Thursday, November 12, 2009

My Studio: How the process began...

I'm starting this blog to record and share a new phase of my life. I have waited a long time to do what I truly love - to design and create jewelry. I majored in jewelry in college, but did not become a jeweler or silversmith due to the cost of materials, tools, and equipment.  Then life happened, and before I knew it years had gone by and I had lost sight of my dream.  A few years ago I decided it was time to get back to making that dream a reality. I never imagined it would be as difficult as it has been.  All during the process of building my studio I longed for someone to talk to, someone with the same interests to share ideas with.  I tried networking to find other jewelry artists in the city where I live, but for the most part I found that they weren't interested in getting together. I knew it had nothing to do with me personally, since none of them knew me. Perhaps it was because they felt that I was their competition. Whatever it was, it made me a little sad.  After all, I'm a good person with a lot to share!  Nevertheless, I managed on my own, (with the help of my sweet husband) and I have been successful in building a place where I can be creative. My motivation for starting this blog is to be the friend that I didn't have to anyone out there who is just starting out on the road to becoming a jewelry artist. My hope is that by sharing my experiences, successes, and failures I can be of some help to someone who just getting started.

First, I want to talk about how the process began. For the last several years I have been working toward having a fully functional jewelry making studio.  In 2005 my wonderful husband and I started the process of turning the attached garage of our home into my studio space.  We took down the existing sheetrock, insulated all the walls, and added lots of light fixtures on the ceiling so I have really good lighting.  As luck would have it, the ductwork for the air conditioning in our home ran right over one corner of the garage attic area, so we were able to locate it and connect to it, which allowed us to air condition our attached garage. We also added cabinets left over from our kitchen remodel, countertops, a laundry room style sink, and lots of electrical outlets. On the floor we put some dense foam mats in a dark gray color that we found at the local home improvement store. The mats hook together like puzzle pieces and make a really nice surface to stand on.  We also installed a high power kitchen vent hood on one side of the room to help with ventilation. In one corner of the studio we made an area for a computer with a desk area and cabinets with file drawers.


When you walk into the Studio my office area is on the left hand side.
(The door going into my studio is on the South wall it doesn't show in this photo, but it is just to the left of the grey trashcan, the computer is on the West wall)


 To the right of the office area is the door going into to the "Shop" area.
(West wall)

We partitioned 1/3 of the garage area with walls and a door to make an area for me to do "dirty" work like grinding, polishing, and soldering. This smaller area we call the "Shop", and the larger area we call the "Studio".  In 2006 we finished working on the studio, but left the shop area unfinished.  A few weeks ago we started working on that area, and it is almost completed - we took down the existing sheetrock, insulated the walls, and built a wall completely covering up the garage door. From the outside everything looks normal, nothing on the outside of the house was changed. This was something we debated about for several years.  The main reason for making this major change was because of the heat.  Our house faces toward the West and for at least 9 months out of the year here in Texas we get a lot of sun beating on our metal garage door. The metal garage door would hold the heat and acted like a radiator.  And, since the garage was not insulated originally, the whole attached garage would fill up with the hot air and cause that side of our house to be hotter than the rest of the house. So, since most of the garage had already been turned into studio space, it made sense to build an insulated wall inside the garage door.  We built the wall several inches away from the door so there was enough room to put 3" of foam board against the door and 9" of insulation in the wall. We left the spring in place, screwed the door to the door frame at the top and sides, took the top rails down, and put the rails at either side of the garage door (inside the wall), so that someday in the distant future, when the next homeowner decides to turn my studio back into a garage  :o (  , all the pieces will be there waiting for them!

There is just a bit of taping, floating and painting to do and the studio/shop building project will be completed.


When you go through the door into the shop area and turn left I have an area for my
rolling mill, my drill press, my cutting shear, my scroll saw, and my flex shaft.
(the drill press is on the South wall - the wall on the right side of this photo
 is the wall that covers the garge door.)


In the middle of the shop area (right across from the doorway) is my soldering station. I have the pieces for a ventilation system that will go just above my work area to pull toxic fumes away while I'm soldering. I will be putting it together soon.  Until then I wear a mask and turn on the vent hood fan in the studio.
(West wall)


 When you walk through the doorway into the shop area and turn right you see
my hydraulic press area and my polishing wheel.
(The hydraulic press is on the West wall and the polishing station is on the North wall)


If you walk back into the studio area and turn around 180 degrees,
to the right of the door to the shop is an area where I can sketch or do beading.
(bulletin board is on the West wall, kiln and vent hood is on the North wall)


To the right of my sketching area is my kiln area (with a kitchen exhaust hood).
(North wall)


All during the studio building process I  purchased tools as I could afford them. Before I started buying tools I got all of the tools together that I already owned. I assessed what I had and what I needed and made a list. At first I bought several smaller tools like files, cutting tools, pliers, dapping tools, etc. Then I moved on to larger tools like a kiln, a rolling mill, a large cutting shear, a magnetic tumbler, a drill press, a flex shaft, a flat sided ring mandrel, a disc cutter, polishing wheel, an air/acetylene torch setup, a lap machine, and my favorite tool of all: a hydraulic press.  After I bought some of the larger tools my husband started asking me, "Are you done buying tools?"   It has become a bit of a joke between us because at first I would tell him "I just need a few more things - then I'll be done!" Now whenever he asks me I just say, "Honey, get used to it - I will never be done!"


Moving around the studio area to the right of the kiln is a counter
next to the sink where I have my "wet" tools - a shaper and a lap machine.
(East wall)


Here is the sink, and to the right of that are my finishing tools,
a rotary tumbler and a magnetic tumbler.
(East wall)


My polishing wheel.


Here is my flex shaft area. Sorry this pic is a little out of focus...


Flex shaft!  Also in this pic you can see the rubber floor mats we found at Lowe's.


Large cutting shear made by Pepe Tools.


Drill press - this is overkill for a jewelry studio, but we already had it, so why not?


My favorite tool!!! My hydraulic press was built by Kevin Potter. You can see all of the great tools he makes and sells on his website: potterusa.com
He also has a great blog:http://kevinpotter.ganoksin.com/blogs/


My only misgiving about how I have done things is that I have spent so much time on the weekends building my studio that I haven't spent as much time as I should have in actually making jewelry. I have had to accept the fact that it was the price I had to pay to get to this point.  Also, since I spent all my extra money on building my studio and buying tools, I wasn't able to set much aside for raw materials. Here and there I would buy a few small pieces of sheet silver or copper, but then I found myself hesitating to use it because I didn't want to waste it.  So, as much as I love tools, no more buying big tools for a while.  Last week I placed my first large order of raw materials including several sheets of sterling silver in different gauges, a bunch of sterling silver tubing also in different gauges, sterling silver wire, copper and brass sheet, and copper and brass wire. It arrived earlier this week and I'm ready to get started!

While I was waiting for my raw materials shipment to come in, I spent a lot of time thinking about a name for my business. It may be premature, but if I really want to make a go of this I will need a business name, a web presence, a dba, and a tax ID number. I've started filling out the paperwork for my dba.  Once I get that I will get my tax ID and then all the paperwork will be done!

So, I have written my first post!  Hopefully I will make contact with others who are interested in the art and craft of metalsmithing and the design and creation of jewelry. I would love to hear from other artists who share my passion - or anyone who simply has an interest!